How to Setup FeedBurner on Blogger

9:10 AM

Blogger is a great blogging platform which almost anybody can use. If you already have a Google account, it’s easy to setup (if not you just need one) and start blogging within minutes. The downside of using Blogger is the lack of built in features that are in my opinion essential to have. I’m going to share with you some of my favorite free Blogger add-ons that I highly recommend using. The first of the bunch being FeedBurner

Step #1 - Setup a FeedBurner Account

FeedBurner’s free rss service (now owned by Google) is very powerful. It allows you to place an rss image like the ones you see below on your blog so your readers can easily subscribe to your blog content. FeedBurner also offers a way for your readers to subscribe by email so everytime you post, an email will automatically get sent to them. Other features include seeing how many blog subscribers you have , which posts are most popular, as well as many other rss feed statistics. You’ve probably seen images like these on websites and especially blogs. This is what they are using. feed-icon32×32.png feedburner-img.gif Create your free account now.

Step #2 - Create Your Feed

The main piece of information you’ll need when setting up your FeedBurner account is your original blog feed url. All blogs automatically come installed with a feed but nothing is really done with it. That’s where the magic of FeedBurner comes in. Your feed url will look something like this:

http://yourblognamehere.blogspot.com/feeds/posts/default
http://yourblognamehere.blogger.com/feeds/posts/default

Feedburner offers auto discover so you don’t even need to figure out your feed url. Just enter your Blogger url right on their home page and it will automatically discover your feed. If you have more than one blog, it will list them all so select the blog you’d like to setup.

blogger-enter-url.gif

For bonus points and just for fun, paste the url into your internet explorer browser and watch what comes up. It’s basically the raw text and images from your blog posts. Pretty neat huh?

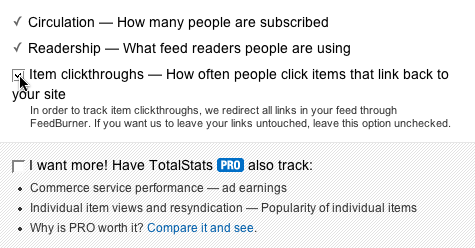
Follow the rest of the setup wizard and you’ll eventually come to the configuration page. Here’s where you want to select the extra features like “track item clickthroughs” and also check the “FeedBurner Pro” box. They used to charge $4.95 a month extra for this service but ever since Google acquired them, they offer these extra features for free. Why not take advantage of it?
blogger-config-stats.gif

Click the Next » button to finish the setup process and enter the feed management interface. Now you’re now ready to make your FeedBurner feed available on your Blogger site!

Step #3 - Point Your Blogger Feed to FeedBurner

Once you setup an account on FeedBurner, you’ll need to make sure all feed traffic for your blog content goes to your FeedBurner feed. This helps make sure your FeedBurner stats are more accurate and even any existing subscribers to your ‘Original Feed’ are routed through FeedBurner.

-The first step is to get the url of the new feed you just created. When you setup your Feedburner account, it asked you for a name of your first feed. For example, our feed on eBlog Templates looks like this:

http://feeds.feedburner.com/eblogtemplates

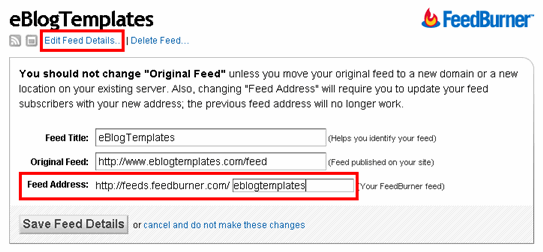
Here’s the screen where you’ll find your new feed:
blogger feedburner example

Once you click on the “edit feed details”, you’ll see this screen. Notice what I highlighted in red? That’s the feed url you need to copy and save.

-Now you’re going to log into your Blogger account and head on over to the “Settings” => “Site Feed” tab.
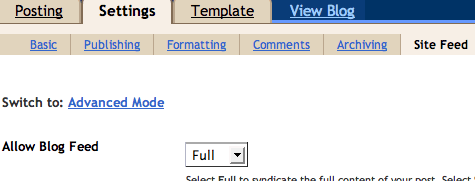
blogger-new-sitefeed.gif

Scroll down until you find the “Post Feed Redirect URL” text box and enter the FeedBurner feed url you wrote down earlier. It will look something like this:

http://feeds.feedburner.com/eblogtemplates

blogger-redir.gif

Make sure you type in your entire feed address including the “http://” portion otherwise you’ll have problems later. Click the “Save Settings” button and you should see the message “Settings were Saved Successfully”. Now Blogger will redirect all feed traffic for your blog to your FeedBurner feed which is exactly what we want!

Step #4 - Promote Your FeedBurner Feed on Your Blog

So now that everything is wired up properly we just need to promote it using one of those cool rss buttons on our blog. FeedBurner calls these icons chicklets (cute huh) so that’s what we’ll call it. Switch back over to your FeedBurner account and click on the “Publicize” tab.

blogger-click-publicize.gif

Then on the left side find and click on “chicklet chooser” and select one of the icons which will end up on your blog.
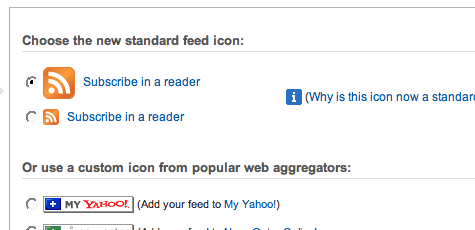
blogger-start-chk-chs.gif

Then scroll down to the bottom of the page and click on the drop-down. You’ll want to select “Blogger” to add the chicklet as a widget to your blog.

blogger-widget.gif

After you click the “Go!” button, Blogger will open in a new window and you’ll need to follow the prompts to continue to add the new widget.

blogger-add-page-element.gif

Once you click on “Add Widget”, it will take you to your Blogger page elements layout where you can arrange the new FeedBurner widget. Save your layout and you’re done! You should now have a cool-looking rss feed icon on your blog where anyone can easily subscribe to your blog. Remember to login to FeedBurner often to check out your stats. You can accurately see the number of subscribers and also get a good idea of what people are reading. It helps you decide the types of things to write about in the future!

For extra credit, see if you can add the Email Subscription widget to your blog. It’s a great option for people to use who don’t understand quite what rss feeds are. I’d also recommend spending some additional time browsing around FeedBurner’s interface because there’s lots of other cool options for you to configure. The best things in life are always free.
Blogger Update Breaks Page Element Layout Editor

8:06 AM


Last night (Feb 12th, 2008) the Blogger/Blogspot engineering team at Google released a patch with a few updates and bugs fixes which apparently did more harm than good. There are numerous reports in the Blogger Help Group of people having problems with their page element layout editor not working properly.


Update (2/15/08): Blogger has acknowledged the scrollbar problem as a known issue but has not given an eta on a fix. They did recommend template designers use the body#layout CSS selector to add CSS styles that adapt templates to the editor which is a good idea. I’ve listed some css code below you can use if you want to add and tweak it for your template. You can also read more about it here.


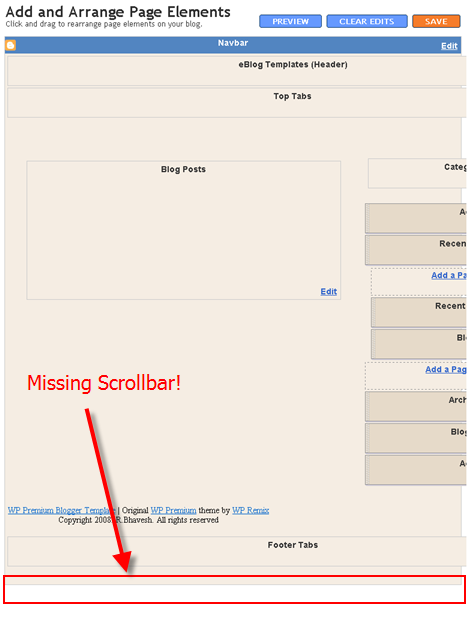
I noticed this myself when I was trying to test and add a new custom xml Blogger template. With some custom templates, the overall width of the actual template is larger than the max 750px template editor window so you would typically have to scroll to the right to be able to edit widgets or page elements. If you look at the screen shot below, you’ll see what I’m talking about.


missing-scrollbar.png


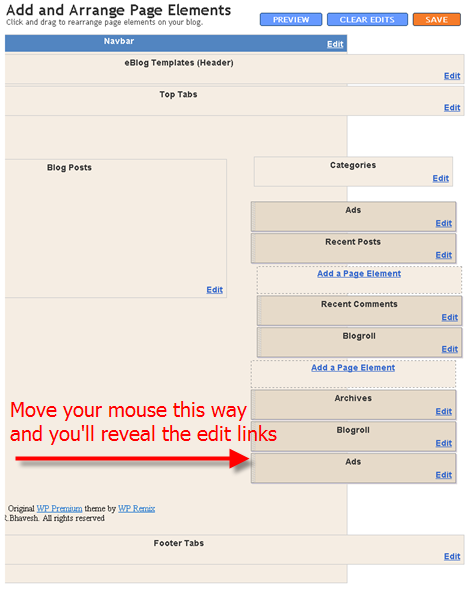
So how are you supposed to edit your sidebar page elements if you can’t even get to the “edit” link on each one? Well, luckily I discovered a workaround which will allow you to get to each buried page element. The template window is actually an iframe which means it’s a window within a window. Knowing this, you are able to scroll within this window even though the scrollbar is not physically visible.


Just click anywhere within the template window and hold down your mouse button. Keeping your mouse button held down, move your mouse as far right as you can. If you do it correctly, you’ll notice it moves the template window to the right and you can now see your “edit” links.


missing-scrollbar2.png


According to their official Blogger Buzz blog, this is a list of the updates made in this release. They probably didn’t realize this release would cause more harm than good but since the Blogspot team is pretty good about listening to feedback, I bet it’s only a matter of time before they fix this bug. They should also make the Blogger page element layout window bigger than 750px. I’d recommend they make it fluid width so it expands depending on the template size being used. Do they not realize the huge demand and usage of custom blogger templates which by nature are wider and better?


Anyhow, here’s a list of the updates announced with this release:


  • Clearer identity options on the comment form (can use OpenID)

  • Transliteration is now available in Kannada, Malayalam, Tamil, and Telugu as well as Hindi

  • Posts with more than 200 comments have them split across multiple pages

  • Layouts blogs now have a “Layouts” tab instead of “Template”


They also addressed a few bugs which seem pretty minor to me except for the “Faster loading times in the post editor”. Nevertheless, any bug fixes are good.


  • Better Persian translations and other BiDi layout fixes

  • A fix to the long-standing incorrect label counts bug

  • Safari 3 support for the Layouts template editor pages

  • Faster loading times for the post editor

  • Improved international support in the post editor’s date and time fields

  • Compatibility fixes for Picasa’s BlogThis! button


If you’re really advantageous and want to correctly fix your template, you’ll need to edit and add and tweak the following new .css elements. These elements actually control the Blogger layout frame so it will shrink the widgets so they properly fit.


This set is for a three column template so if you only have two then just delete the left-sidebar-wrapper element. Your template div ids might be named differently so you’ll need to make sure the names are consistent otherwise it won’t work properly.


body#layout #outer-wrapper
{ width: 750px; margin-left: auto; margin-right: auto; }
body#layout #header-wrapper { margin-left: 0px; margin-right: 0px; width: 740px; }
body#layout #main-wrapper { margin-left: 0px; margin-right: 0px;
width: 400px; padding: 0 0 0 0; } body#layout #sidebar-wrapper
{ margin-left: 0px; margin-right: 0px; width: 160px; padding: 0 0 0 0px; }
body#layout #left-sidebar-wrapper { margin-left: 0px; margin-right: 0px; width: 160px;
padding: 0 0 0 0; } body#layout #footer { width:600px; margin:0 auto; padding-top:15px; }

Hopefully this will help you and fix your Blogger template so the layout editor shows all your widgets properly. I plan on adding this code to any new templates going forward so it’s not a problem for you!


Free Live Blog Traffic Widget

8:03 AM


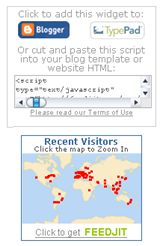
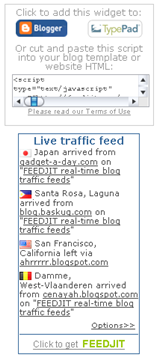
Ever want to know things like who’s visited your web site, where they came from, and what they’re reading? Well, now you can with this cool free blog widget by FEEDJIT. They provide a simple page where you select one of four widgets which are: live traffic feed, live traffic map, live recommended reading, or live page popularity.


Here are my two favorites which will fit nicely in your blog’s sidebar.


feedjit-widget.png feedjit-widget2.png


It couldn’t be any easier for Blogger users to install. Just click on the “Add It” link and a Blogger icon will appear. Click on that and it will take you to your Blogger site asking to install the widget. Same goes for Typepad users. WordPress or other web site owners will need to copy the small bit of javascript and paste it somewhere on your site.


Having this widget on your blog makes it fun to look at your site each day and see who’s recently stopped by. Knowing that people from all over the world actually read some of your content is pretty rewarding. Also knowing what sites they came from provides some good data especially if you don’t have any blog analytics like Google Analytics running on your site.


Go and get your free FEEDJIT blog widget and get a better idea of who’s coming to your blog!


Super Charge Your Blogger Comments With Intense Debate

7:59 AM


One of the shortcomings of Google’s Blogger is the lack of a quality commenting system. Out of the box, it comes with a very generic non-interactive inline comment reply system that works fine but is to basic for most people. Luckily there’s a new website called Intense Debate that provides an amazing free commenting package which will impress your readers and really super charge your blog.


intense-debate-logo.jpgIntense Debate allows you to replace your standard blog commenting system with what they call “A completely new tool for conversation”. It’s very easy to setup using their wizard even for a custom Blogger template. You’ll also need to import your old comments which isn’t too difficult either and add the new widgets to really spice up your blog.


Features Include:


  • Easy to setup code - Wizard system automatically updates your existing template with the required code

  • New comment email notifications - Don’t waste time checking back on a blog to see if anyone responded to your comment

  • Reputation and comment voting - Move the best comments to the top based on their reputation

  • Sidebar widgets - Add widgets like recent comments and a top commenter widget

  • Social traffic drive - Link to several major social sites you are a part of to give fellow readers an idea of who you are

  • Track people, blogs, and more - Allow your readers to track comments and the people who make them across different blogs

  • User profiles - Have readers setup their own profiles which they can use on any blog using Intense Debate

  • Threaded comments - Discussions are organized into threads so they’re easier to follow

  • Keep your existing comments - Import your existing comments so you don’t lose them


Getting Started


Ok, you’re sold on using Intense Debate as your new commenting system and want to get started. First you’ll need to enter your Blogger url, then sign up for an account, and then you’ll be presented with two options. You can either install Intense Debate as a widget or have Intense Debate automatically insert the required code directly into your blog template. The latter is their recommended choice and what I did.


widget-or-template.jpg


You’ll then be presented with the “Advanced install guide” which includes five steps. The last step has you upload your template into their system so it will automatically insert the required comments code. It’s important to note the “Replace comments on” section because if you select the “All posts” option, you’ll need to import your existing Blogger comments into Intense Debate in another step later. This is the option I recommend you choose so all your comments are unified.


Some people select this option and then are surprised when they look at their blog because it looks like all their comments were deleted. The comments are still there but sitting on the Blogger server. Remember when you start using Intense Debate, you are saving all comments into their system.


advanced-install.jpg


Before you click the “Upload file and continue” button, make sure you’ve made a backup of your template just in case something goes wrong. When I first tried using Intense Debate’s, it altered some of my custom template code which screwed things up. It wasn’t a big deal because I could just go back into the code and make the changes myself, but for those who are less inclined to make changes, it’s better to just have a backup. Hopefully you won’t have any problems but chances are you’ll need to tinker with the code a bit after Intense Debate inserts it’s sections.


last-step.jpg


Here’s the last step which basically spits back your original template with the additional Intense Debate sections added. Copy this and paste it back into your Blogger html editor. Save it and go look at your blog. Click into one of the posts and you should now see a cool blog comments section built right into the post footer which will look something like this:


new-comments.jpg


Ok, now that you’ve got the code setup correctly, it’s time to import your old Blogger comments into the Intense Debate system. Go back into Intense Debate and click on your blog name tab => tools => import comments. The screen you should be at will look something like this.


import-comments.jpg


Enter your Blogger username and password and then it will ask you which blog you want to import the comments from. Now it will automatically import your old comments into your Intense Debate account. Go over to your blog and make sure the comments made it over ok.


Add Widgets


If you really want to take advantage of the extra features provided by Intense Debate, you’ll want to add at least one of the free widgets. I like the recent comments and top commenter widgets which will add some cool flare to your blog. If you already have a recent comments widget that uses your rss feed, it most likely won’t work anymore because all your comments are being sent to Intense Debate. You have two choices, either update your existing recent comments rss feed url with the new Intense Debate one, or remove that widget and replace it with the Intense Debate one. The choice is up to you and how it fits into your blog’s layout.


Here’s an example of what the top commenter widget looks like:


about_widgets.png


Other Options


I urge you to spend some time getting familiar with the dashboard in Intense Debate since there are many options you can setup. It will give you 100x more power than the default Blogger commenting system and really give you a handle on your blog comments. Here’s a couple of screenshots of my dashboards:


intense-dash.jpg


dashboard2.jpg


Summary


This commenting system is really a great addition to any blog especially Blogger because of it’s lack of features. It’s easy to setup (it took me 15 mins) and comes with a ton of great features. There are a couple other things to point out before you decide to make the switch. In order to moderate or view anything related to your comments, you’ll now need to login to this system separately. Also, although it’s not required, it’s beneficial for anyone posting a comment on your blog to have an Intense Debate account. They don’t need one to post comments, but if they want to add a custom picture next to their post, vote on comments, etc they’ll need to login.


Lastly, if you’re using a Blogger template with custom comment sections (like comment count on the post), you might need to tweak the template code after Intense Debate adds it’s required sections. For me, I had to modify it a little bit before it was displayed properly in my template. Not a big deal, but worth noting.


Overall, I highly recommend using this commenting system because it gives you much more power over the boring bland Blogspot commenting system and it also makes your blog look and act much more professional and it’s fun to post/rate comments. Give Intense Debate a try and let me know what you think.


How to Make Money From Your Blog - Tip #2

7:54 AM


tla-logo.gifIn the first article of our series, “How to Make Money From Your Blog - Tip #1” we covered the most popular and easiest way to monetize your blog using Google AdSense. Our next tip is another great way to create a steady flow of income from your blog on a monthly basis.


Believe it or not, it’s by selling text links on your blog. Yup, you heard me right — people will pay you to put links on your site.


Why would people buy links from my blog?


That’s a very good question and there’s several reasons. The most popular one being it helps their site rank higher in search engines like Google and Yahoo. Essentially, the more backlinks you have pointing to your website, the more important your site is (in Google’s eyes).


There are many other factors involved and I could write an entire article about it but we’re going to stay on track. Another reason is because buying links from another site drives additional traffic to their site but this is seen more as a bonus since 99% of people who buy links do so for the backlink value.


That’s great and all but how do I get started?


You could easily build your own advertising page and tell visitors “Text links for sale” but you most likely won’t make any sales (unless you’ve got a really popular site with lots of traffic already). So instead, let’s leave the sales, marketing, and invoicing of your links to a 3rd party who’s already established in this space.


I use (have been for a few years now) and recommend Text Link Ads. They are a well established link buying and selling company which means you don’t need to do anything except add your listing, set a price, and approve new links.


Personally I like selling links through TLA better than Google AdSense because it’s guaranteed monthly revenue. Google AdSense is CPC which means you only get paid when someone clicks on your ad. Using Text Link Ads, you get paid just for letting someone put a link on your site. You set the price, they buy the link, you get paid. It’s that simple. I make several hundred dollars a month from different niche blogs just by selling links using TLA.


Step #1 - Sign up for Text Link Ads


This is the first step for any new advertising program and usually the hardest. TLA carefully selects which sites can be added to their network so if your blog is brand new, then you should wait at least 6 months before applying. If decide to apply anyways and get denied, I’d send them an email and ask to be manually added.


Their automatic approval system runs some basic calculations on your site (blog age, page rank, popularity, etc) which determine whether you’ll be approved. I’ve actually been rejected for a couple of my blogs but when I emailed them, they manually approved them. Sign up for Text Link Ads and start selling links today!


Step #2 - Add your Listing to their Marketplace


Assuming you’ve been approved, you can now login and setup your site. This is where the power of TLA comes into play. They have a virtual marketplace where you list your site and hundreds of visitors (if not thousands) a day have a chance to see your site.


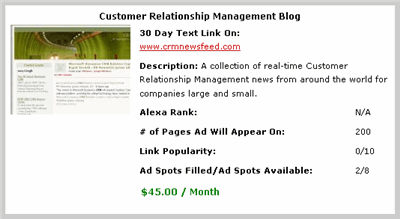
You’ll enter your site title, a brief description, select a category where your blog belongs, how many ad spots you have available (Blogger limits you to only 5 per link widget but you can have two widgets for a total of 10 links), etc. The price is determined by TLA but again, it’s negotiable. I’ve emailed them asking to raise the price on at least two of my blogs and they did it no problem.


tla-example.gif


Once you’ve added it, your listing will look something like the above screenshot. This is what anyone visiting the TLA marketplace will be able to see.


Step #3 - Installing the TLA Code onto your Blog


This may sound intimidating especially if you’re not comfortable editing template code but it’s simple. Text Link Ads has a wizard script that walks you through the entire process. The only part you need to do is create a new page element on your blog (you must be using the new xml Blogger templates to do this).


Here are the two steps you need to complete within your TLA account before actually going into your Blogger template page elements.


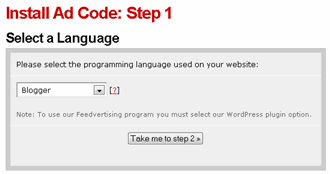
tla-step1.gif


tla-step2.gif


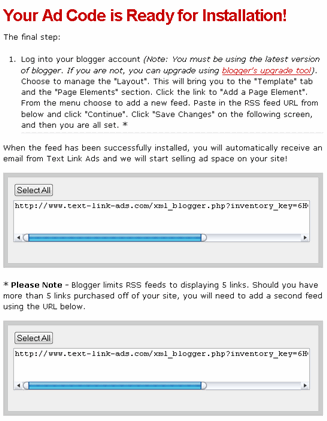
Now that you’ve got the code, you can just follow the instructions that TLA provides about plugging this into your Blogger template. Once TLA verifies that the Ad Code you installed is setup properly, your listing will show up in their marketplace. Then it’s only a matter of time before you make your first text link sale.


Don’t get frustrated because it might take a few months before that “You’ve got new links to approve” email comes from TLA. You need to think of this as a long-term investment because once someone buys a link, they’ll want it for several months.


More facts about TLA


  • You receive 50% of the sale price for each text link ad sold off your blog

  • You can display Text Link Ads on the same page with Google AdSense, Yahoo! Publisher Network, and other contextually served ads

  • You get paid monthly directly to your PayPal account or have them mail you a check

  • Easy to setup and start on Blogger


So what are you waiting for? Go sign up for Text Link Ads and setup a publisher account and monetize your blog now. It kills me when I see blogs out there without any sort of advertising. I can’t stand the “Made for AdSense” sites but if you’ve got a blog, why not put a couple ads or links to help pay for your lunches?


Stay tuned for the next article in this series about Making Money From Your Blog.


How to Make Money From Your Blog - Tip #1

7:52 AM


For many people blogging is a way to express themselves online for the rest of the world to read. Usually it’s about a specific topic or if it’s a personal blog, then the blog posts could range from anything like your latest trip to Europe or how your dog just had puppies. Nevertheless, blogging is easy for anyone with a computer and internet access to use.


So for those who enjoy writing and spend lots of time doing it, why not make some extra money from it? It doesn’t cost you anything and only requires a little bit of time to setup but the return could be well worth it. That’s the beauty about online advertising programs — they work 24/7 even when you’re sleeping. Talk about a nice passive way to earn some extra money each day!


My first tip is probably the most popular method (and easiest) way to get started with making money from your blog. It’s a program called AdSense from a small company you’ve probably never heard of called Google. :-) Knowingly or not, you’ve viewed hundreds of Google’s ads online and probably even clicked on a few since they were relevant to whatever topic or website you were reading at the time. That’s one of the great things about this program and I’ll talk more about it further down this post.


Use Google AdSense


Google adsense logoGoogle’s advertising program is free to sign up and you can usually be online within an hour or so (assuming your application is approved quickly). Then adding AdSense to your blog is easy especially with Blogger’s new AdSense widget (it’s quite simple with WordPress as well but I’m going to assume WordPress users already know how to do this since it’s just cut and pasting html). Once your application is approved, just log into your account, customize your ad unit, and copy and paste a block of HTML code into your blog. I’ll give you a walkthru of this process.
Step #1 - Sign up for Google AdSense


First you need to create an AdSense account (Sign up) which doesn’t take more than a few minutes to do. Once you’ve got your account setup and approved, go on to step #2.


Step #2 - Add the AdSense Page Element to Your Blog


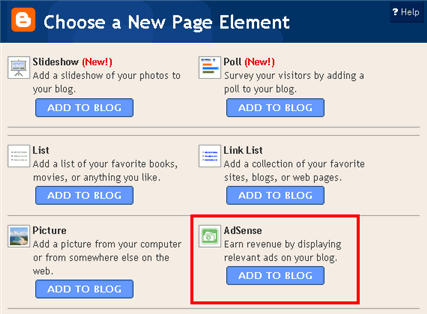
The nice thing about the new Blogger is you can easily add Google AdSense to your blog using their built in page elements. Login to your Blogger account, navigate to “Template” => “Page Elements” and then within the layout area, click on “Add a Page Element”. From there you’ll see this screen where you want to select the “AdSense” Page Element and click on “Add to Blog”.


add-adsense-element.gif


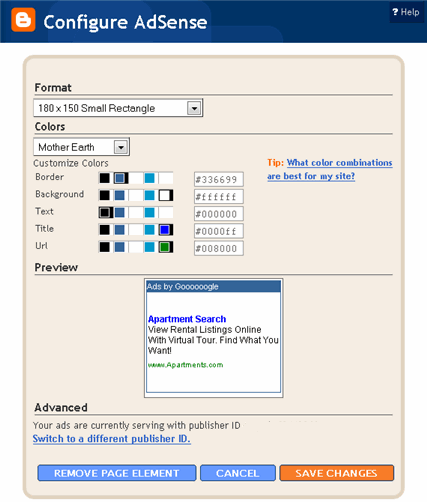
Next you’ll see another screen where it will ask you to login (if it’s the first time you’ve tried to add this AdSense Page Element before). Just enter the email address and password you used when setting up your AdSense account. Once you successfully login, you’ll next see the ad configuration screen. This is where you select the ad format type (leaderboard, banner, text ad, etc) with many different sizes to choose from. Now remember to keep your site visitors in mind when selecting an ad format. You don’t want the ad to dominate your entire blog page which would annoy your readers. I’d recommend starting with a small rectangle or horizontal row format before going too crazy.


configure-adsense-element.gif


Don’t forget to also select a nice color scheme that matches your blog. Statistics show that the more blended in your blog ads are, the better change people will click on them. Remember to abide by the Google TOS though which I encourage you to read before breaking the rules by accident. Now once you’ve got the exact color scheme and ad format ready to go, click on the orange “Save Changes” button to add it to your blog.


Step #3 - Save and View Your New Ads


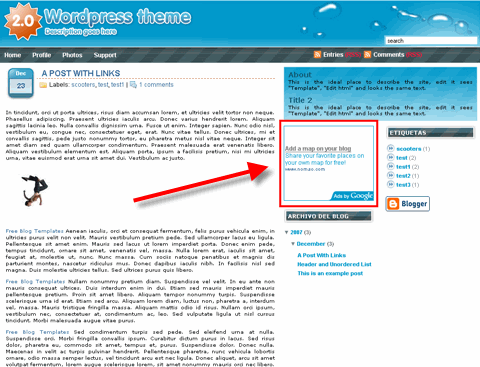
You should now save your Page layout and view your blog. The ad unit should be in place and ready to start making you money! Sometimes it takes a little while before ads start showing up and even a couple of days before relevant ads are displayed. This is usually the case if you’ve got a newer blog and Google isn’t familiar with your blog’s content yet. Google will then crawl your site and identify it’s general topic so it knows what ads to display. Pretty cool eh? Here’s a picture of the end result. Notice the red highlighted ad unit now displayed on my blog.


blogger-adsense-end-result.gif


Bonus Tips


Now a few tips and a warning before you get too giddy about all this money you’re going to start making. First, never (and I mean never) click on your own ads. Google will know and they will ban you from the AdSense program. It’s not worth it! Secondly, don’t expect the big bucks to start rolling in right away. It’s a numbers game. The more traffic you get to your site, the better chances you have of somebody actually clicking your ad. Typically with ads, you can expect a 2% - 4% click thru rate (CTR) assuming your ad is in a good spot which means for every 100 page views you get, expect 2-4 ad clicks. Translation — keep writing great quality blog posts and your traffic will increase over time and so will the ad clicks which equals money in your pocket.


Other Reasons to Use Google Adsense


  • It’s a very simple and proven solution that hundreds and thousands of blogs and websites across the world use today.

  • AdSense is by Google which is reliable and trustworthy. Once you have earned money from Google, they will pay it to you.

  • The ads will be contextual, which means they will be relevant to the content of your blog. Targeted ads = happier visitors, higher click thrus, and more money for you.

  • You get paid on the click which is far better than on a conversion.

  • Google provides free reports so you can see exactly how many clicks and how much you’ve earned! You’ll find yourself using that report every day just to see how much money you’re making.

  • The ads are so well-matched to your site’s content that your readers will actually find them useful.


So go sign up for your AdSense account (Sign up) now and you’ll soon be able to start making money from your blog! If you’ve got any problems or questions while setting this up, please post a comment below. We will do our best to answer any questions you may have or at the least point you in the right direction.


Please make sure to click on the AdSense links provided in this article as the sign up referral helps support and offset our expenses for maintaining this site.


Blogger Navbar - How to Remove It

7:44 AM


First off, what is the Blogger Navbar?

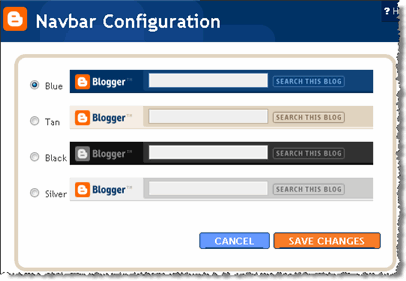
The Blogger Navbar appears by default at the top of every Blogger-powered blog. It is available in several colors, and is configured in the Template tab in Blogger’s interface. If you are using a classic template, you’ll see a menu from which you can select a color. For blogs using Layouts, just click the “edit” link on the Navbar page element. Blogger gives a more detailed explanation of this here.


There are several reasons why I think it’s important to remove the Blogger nav bar but I’ll name my two most important reasons. First one being that it’s an eye sore and makes your blog look less professional. Secondly, when you click on the “next blog” button you never know what type of blog you might stumble upon. There are so many spam blogs with adult content or other information you don’t want young people to read. When you do block the navbar on your own blog, you prevent others from also easily leaving your site and accidentally heading to one of these spam sites.


blogger navbar


Unfortunately Blogger doesn’t give you the option to remove the navbar easily but this simple modification to your template allows us to hide it. The good news is that it’s not against Blogger’s TOS so it’s not illegal to do. I read a post recently by Blogger Support that stated


While it’s not officially against our TOS, we discourage folks from removing it because we think it’s a great feature with more improvements to come. Follow the above instructions at your own peril, as Blogger controls the TOS and has been known to change it.


So the change you want to make is to the stylesheet. First make sure you backup your current template just in case you make a mistake. Click on the “Download Full Template” link ( go to “Template” => “Edit HTML”) and save it locally. Next, from within your template code you want to scroll down until you find ]]></b:skin> and stop. Then you’ll want to add this line of code right above this line.


#navbar-iframe {height:0px;visibility:hidden;display:none}

So once you’re done, it should look like this:


#navbar-iframe {height:0px;visibility:hidden;display:none}    ]]></b:skin>

After that, save your template and view your blog. The top Blogger navbar should have disappeared! Looks much better now doesn’t it? If you ever want to add the navbar back, it’s simple. Just remove the line of code we just added. Also, if you ever switch templates, make sure to follow these instructions again because it needs to be done with each new template you use.


How To Add The Blogger “Read More” Expandable Posts Link

6:18 AM


This is a pretty popular Blogger hack that lots of people have asked me about. Instead of answering to each email individually, I thought it would make more sense to write an article about it.


With this hack, you can choose to display a select amount of text from the beginning of each post as a teaser instead of showing the entire post on the front page of your blog. Then when people want to read the rest of the post, they can click a “read more” link to see the full post. This is very handy if you have lots of long articles all on one page. (Note that you’ll need to have post pages enabled in order to make this feature work.)


Step #1 - Update Your Template Code


First you need to edit your existing code so I recommend copying and pasting it into notepad or any text editor. Also, it’s smart at this point to create a backup of your template just in case something goes wrong. Now do a search (CTRL + F) within the text editor for the following code post-header-line-1. This is the default code that Blogger includes but some custom templates remove or change this code so you might have trouble finding it. If you can’t locate this text then try searching for <data:post.body/> instead. Your template will for sure have this since it’s the tag that actually prints the body of your post.


Now depending on which code you were able to find will determine how easy the next steps will be. You might need to do some detective work first in order to get this working properly in your custom template. The idea is to get this new code into your template before the <data:post.body/> tag. Keep reading and hopefully the explanation will illustrate the concept clear enough so you are able to adapt this hack to your custom template.


Add the following code below the <div class=’post-header-line-1′/> and <div class=’post-header-line’> tags if you’ve got both.


<b:if cond='data:blog.pageType == "item"'>

<style>.fullpost{display:inline;}</style>

<p><data:post.body/></p>

<b:else/>

<style>.fullpost{display:none;}</style>


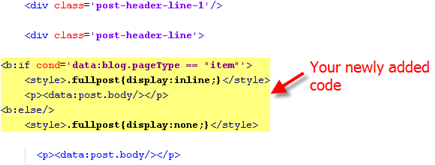
The result should look something like this:


new-code-block.png


If you don’t have the default <div class='post-header-line-1'/> tag then your result should look something like this instead. This is how it would be done in the MushBlue Blogger custom template:


new-code-block-mush.png


Notice in both examples that the code in yellow and the <data:post.body/> tags are the same — it’s just tag above it that will differ based on the template you’re using.


Now let’s add one more bit of code which will actually create the “read more” link in your post. This code will go below the <data:post.body/> tag so copy the following and paste it in. Feel free to change the “Read more…” text to whatever you want the link to look like. Be careful not to delete any other code during this process.


<b:if cond='data:blog.pageType != "item"'><br />

<a expr:href='data:post.url'>Read more...</a>

</b:if>

</b:if>


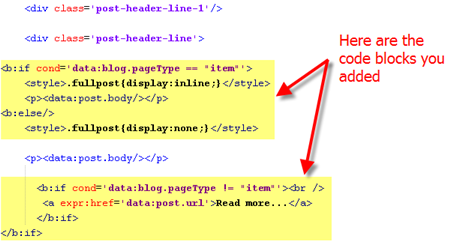
Yes, there are supposed to be two </b:if> tags in the above code so don’t think it’ s a mistake. The result should look like this:


new-code-block-2.png


This code will be the same no matter what template you are using. Just make sure it goes below the <data:post.body/> as shown in the image above.


Now let’s look at what the final result should be. Here’s the updated code block you just worked on all put together:


new-code-block-3.png


Ok, you’re all done editing the template code. Paste it back into your Blogger html window and save it. If you get an error, you made a mistake. The most common mistake is to accidentally delete a > or < while pasting in the new code. If it saved successfully, it’s time to move onto the next step and modify a quick Blogger format setting.


Step #2 - Add a Class Tag in Your Default Post Template


For this step, you need to navigate in your Blogger account to “Settings” => “Formatting” and scroll all the way down to the bottom. It’s the last option called “Post Template”. You’re going to paste in the following code:


<span class="fullpost">


</span>


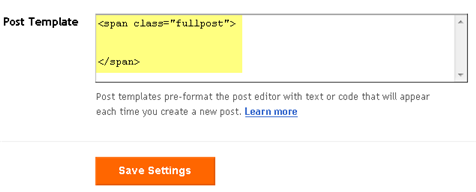
You’ll want to keep the spaces in there which will make sense later. After you save this, it will look like this:


post-template2.png


Step #3 - Create a New Post


Ok, we’ve got everything all setup so it’s time to go and test it out. Hopefully you’ve got a new post in mind for your blog. If not, then we’ll just create a test post which you can later delete. When you click on the “Posting” tab, you’ll notice that the post text area is now pre-populated with the <span class=”fullpost”> and </span> tags. If not, then you didn’t save it properly so go back and re-read step #2.


So when writing your new post, anything you put above the <span class=”fullpost”> tag will be the teaser text. The main body of your post needs to go in between the <span class=”fullpost”> and </span> tags in order for the “read more…” link to work properly. See the screenshot below. Sometimes pictures illustrate better than words.


post-template-result2.png


Now publish or preview your post to see the “read more” hack working on your blog. If it doesn’t show up for some reason, go back and run through the steps again. Most likely you pasted the code blocks in the wrong places. It’s difficult to troubleshoot these issues since each template can be unique so please make sure to double-check your template before asking for help in the comments section below.


Here’s the live post with the “read more…” link properly working based on the text I used above in the post text area.


post-results.png


Additional Info


If you want to go back and update your old posts with this new “read more…” feature you can. Just go back and edit each post manually. Essentially you’ll need to paste in the <span class=”fullpost”> and </span> tags breaking apart the post into two parts.


For some posts, you might not want to use this feature at all. If that’s the case, just delete the <span class=”fullpost”> and </span> tags from within your new post text area. Then your new post will show up entirely just like it used to before you implemented this hack. Enjoy!


How to Install a Blogger XML Template

6:00 AM


This article was written to provide a step-by-step guide on how to correctly apply a new xml Blogger template to your blog. This process can be tricky depending on several factors (quality of the code in the new template, your existing widgets, etc) so you need to be careful when changing your template. Don’t worry though, just follow our step-by-step instructions below and we’ll hopefully get you through it without much pain. :-)


Many people make the same mistake when installing a new blogger template. Most problems when installing a new template are caused by the blogger widgets (Page Elements) that you’ve spent time setting up in your previous template. Almost all Blogger templates available for download on this site are in the new Blogger xml template format so if you’ve downloaded the template from us, it’s going to be much easier to follow our instructions.


Step #1 - Backup Your Current Template


Backup Blogger TemplateBackup your current Template just in case you make a mistake. This is very important so you can always go back (click on the screenshot to the left to see exactly how this is done). You’ll want to navigate to the “Template” => “Edit HTML” section of Blogger and then look for the “Before editing your template, you may want to save a copy of it. Download Full Template“. Click on the “Download Full Template” and save it somewhere easy to find later on your computer. We are not responsible for any mistakes you make in applying your new Blogger template. Once you have saved this .xml file onto your computer, move on to step #2.


Step #2 - Take a Screenshot of Your Page Elements


Blogger Page Elements ScreenshotThis next step isn’t necessary but I like to do it anyhow. Take a screenshot of your “Page Elements” page just so you know exactly what widgets (Page Elements) you had before applying the new template (an example of the exact page you should take a screenshot of is in the image to the left). If you blow away all your widgets and you don’t remember which ones you had, this screenshot will at least help you remember. If you’re unsure as to how to take a screenshot, then check out this quick tutorial (MS Windows).


Step #3 - Upload Your New Blogger Template


Upload new blogger templateNow it’s time to upload the new Blogger template from your computer. You’ll want to navigate to the “Template” => “Edit HTML” section of Blogger and then look for the “Upload a template from a file on your hard drive:” text. To the right of that you’ll see two buttons. First, you’ll click on “Browse” and navigate to the new .xml Blogger template on your computer and click “Open”. Then you click on the “Upload” button and cross your fingers.


At this point Blogger is attempting to apply the new .xml Blogger template to your blog. After it’s done, you’ll get a message stating that the upload and new template was applied successfully (in that case you’re done!) or more likely in my case, you’ll get a red error message that states something like:


Widgets are about to be deleted


Please confirm that the following widgets should be deleted. All the widgets’ configuration data will be lost.


  • Text1

  • BloggerButton1

  • Poll1

  • Profile1


Now if you’re like me, you don’t want to lose all those widgets (Page Elements) you spent lots of time configuring and arranging on your blog. If you don’t care and really don’t have anything you’ll be upset losing, then go ahead and click on the “Confirm and Save” button that looks like this:

confirm-save-button.gif


Just remember, that you’ll need to re-add any page elements that you had previously setup in your old template. If they were simple or just recently added then I’d recommend just re-adding them instead of having to follow the next steps. If you decide you want to keep your widgets (Page Elements) then write down (or take another screenshot) the list mentioned above that are going to be deleted. You’ll use this list later when we migrate over your widgets.


Step #4 - Transfer Widgets to New Blogger Template


This process is going to take some careful cut and pasting within the template code so if you’re not comfortable doing this, then I’d recommend just ending on the previous step. First things first, click on the blue cancel button (you should still be on the previous step) that looks like this:

cancel blogger button


This will cancel out of the new Blogger template you were just trying to upload. Next, we’re going to essentially make a temporary placeholder for your widgets (Page Elements) within your current template. You should still be in the “Template” => “Edit HTML” section of Blogger so if you’re not, go back to that section.


You’re going to actually edit this template code now so pay close attention. Look for the following piece of code which is all the way at the bottom.


</body></html>

Now you’re going to replace that code with the following bit of code:


<b:section id='widgets-placeholder' showaddelement='yes'/></body></html>

Save your template and you’ll see this message (which is a good sign):


blogger changes saved


blogger-new-page-element-footer.gifWhat did we just do? We created a brand new widget (Page Element) in your current Blogger template so we can move all your widgets over to keep them safe! Next navigate over to the “Template” => “Page Elements” section of Blogger and you’ll see a blank new footer section.


Drag all your widgets (Page Elements) that were going to be deleted (we wrote them down or took a screenshot in step #3). The order doesn’t really matter as long as you’ve moved them all down into the widget (top image on left). After you’re done, it should look something like this (bottom image on left):


blogger moved widgetsNow click on the “Save” button and the temporary placeholder for our widgets will be saved. We’re not done quite yet but if you’ve gotten this far already you’ve done great! The hardest part is over. Now we’re going to copy the widgets we just protected over to your new template. Hold off on that bathroom break and let’s keep going.


Next, go back to the “Template” => “Edit HTML” section of Blogger and scroll down in the template code and look for the line of code you added before:


<b:section id='widgets-placeholder' showaddelement='yes'/></body></html>

There should now be a bunch more code in between it which will look something like this:


<b:section id='backupwidget' showaddelement='yes'>
<b:widget id='BloggerButton1' locked='false' title='' type='BloggerButton'/>
<b:widget id='Poll1' locked='false' title='What is your favorite car' type='Poll'/>
<b:widget id='BlogArchive1' locked='false' title='Blog Archive' type='BlogArchive'/>
<b:widget id='Profile1' locked='false' title='About Me' type='Profile'/>
</b:section></body></html>

This is a list of all your widgets (Page Elements) that we just moved into the footer. You want to select all this code and copy it. We’re going to paste it into our new Blogger template code which will complete the transfer safely.


Now open your new Blogger template xml file in a text editor (you can use Notepad, just right click -> Open With -> Choose Notepad). Once you have it open, scroll all the way down to the bottom of the code and look for the following code:


</body></html>

You’re going to replace this code with the new code you just copied above. Make sure you only replace that one bit of code otherwise you might run into some problems. Save your new Blogger template and you’ve finished transferring your widgets (Page Elements) into the new Blogger template!


Now after all that work just to save your precious widgets, let’s hope the new template works ok in Blogger. Go back to step #3 above and upload your new template like you attempted to do before. If all goes well, your new template will properly save and your blog will be updated!


Step #5 - Move Your Widgets Back To Their Original Spots


I’m assuming your new template installed without and problems and you’re ready to move your widgets (Page Elements) back to their original spots. This is just the reverse process of what we did before by going to the “Template” => “Page Elements” section of Blogger and moving them out of the footer and back into the sidebar (or wherever you originally had them in your old template).


After you arrange them to your liking, make sure to save and view your blog. If all went well then your blog should be looking the way it did before the new template was applied (well, except for the new beautiful design which is the main reason for this hassle in the first place right?). :-)


Summary


Congratulations on adding a new custom Blogger xml template to your blog! The whole process should have taken anywhere from 15 minutes to 1 hour depending on your experience and comfort with blog template code, the code quality of the new template, and the number of widgets your blog currently has. Blog designs shouldn’t have to change very often so hopefully this is a one-time process for you. If not, I recommend you bookmark or add this page to your favorites so it’s easy to find the next time you decide to change Blogger templates.


Still Having Problems?


Problems or errors during this procedure? Unfortunately, the Blogger xml templates are very picky and don’t always work with your blog. This can be because of several reasons so it’s not always easy to resolve. Sometimes the best way is to just delete one widget at a time and see if that resolves the issue. Blogger doesn’t give you very good error messages to act on so sometimes it’s a shot in the dark.


If you’ve got a specific case you’d like to ask about, please post a comment below. I will respond and help if possible. Your specific problem might help others address their issue as well.